对话Vitalik Buterin:坎昆升级技术上进展顺利,再质押有趣但存系统性风险
作者:Weilin,PANews
3月21日,以太坊创始人Vitalik Buterin参加了ETHTaipei 2024,并接受了PANews等媒体的采访,谈到坎昆升级、再质押和AI+Crypto等多个热议话题。
他认为,从技术角度来看,坎昆升级升级进展顺利,但升级后,随着blob用户数量的增加,网络费用有可能再次增加。他看好以太坊上稳定币和去中心化社交在未来对社会的广泛影响。此外谈及最近的MEME币,Vitalik也认为这令他感到惊讶。
在AI+Crypto领域,目前面临的最大挑战之一是我们代码中的错误,一个可能性是,AI使我们能够更轻松地使用验证工具来证明更大范围的代码正确性,减少我们能够减少的错误数量,空间变得更加安全。此外,再质押赛道很有趣,但如果做得不好,各种系统性风险最终可能会影响到以太坊的验证者。
以下是经过编辑后的对话实录。
1. Dencun升级如何为以太坊生态系统做出贡献?能分享一下EIP-4844减少交易成本,将如何影响以太坊生态系统吗?
Dencun升级的目的是大幅提高可扩展性,并降低Layer2网络(特别是rollups)支付的交易费用。它的实现方式是在每个区块内创建一个独立的数据空间部分,即所谓的blob。这些数据无法被EVM访问,这很重要,因为这意味着当客户端在验证以太坊区块时,他们不必同时访问这些数据。
但这些数据是以太坊区块链保证可用的数据。这对于rollups非常有用,也适用于任何依赖数据可用性以确保安全性的Layer2项目。例如,确保其他节点能够同步,如果当前节点消失,或者如果有人看到错误的答案,确保他们可以提出质疑等。过去一周我们已经看到L2网络的费用大幅下降,有些情况下甚至下降了50%。
现在我认为有必要提醒一下,随着blob用户数量的增加,这些费用有可能再次增加。从技术角度来看,这次升级进展顺利。我认为测试者的百分比仅从99%降至95%,这比我们之前的任何分叉都要好。然而,有趣的是,使用量相对较低。目标是每个区块约有三个blob,但平均使用量仅为每个区块一个blob,这意味着目前blob的成本非常低廉。我认为随着时间的推移,使用量最终会增加。目前对于rollups而言,费用非常便宜,这绝对是件好事。
2. 你认为以太坊在未来五年内,对社会最具变革性影响的是什么?
未来五年对以太坊来说将至关重要,因为许多应用程序,虽然在相当理论和小规模的阶段,但实际上已经开始逐渐准备好面向现实世界的使用了。
在区块链领域真正影响现实世界的一个重大影响是,这个领域所产生的想法已经在很多方面渗透到更广泛的世界中,并得到了认可。比如,Reddit即将进行IPO。他们做的一件事是给予活跃在社区中、非常积极的贡献者和版主等,与机构投资者同等的参与机会。
但除此之外,实际使用的最大影响是稳定币,人们使用稳定币来存储、交易。我认为未来五年会发生什么?首先,要在这个领域取得成功,你需要拥有非常好的用户体验和非常低的费用。从历史上看,以太坊并没有这些东西,但在未来五年,如果以太坊开始拥有这些东西,我们已经看到了L2网络已经开始朝这个方向发展。我认为这种改善将继续进行。
一旦实现了这一点,我预计以太坊将成为主导者,并帮助使稳定币以一种实际开放、实际去中心化的方式为人们所接受。除此之外,我预计非金融应用将真正开始产生更大的影响。因此,过去一年,我们已经看Farcaster的成功,特别是在某种程度上还有Lens和其他一些项目,它们正在创建社交媒体平台的替代品。
基于以太坊的身份领域,我预计它会迅速增长,技术正在迅速改进。
3. 我们看到许多项目提出了“模块化区块链”的构想,同时我们也看到了以太坊L1可能负责共享排序(shared sequencing)的想法。你如何看待,L1应该集中处理哪些功能,而应该将哪些功能留给各个L2?
模块化区块链的出现基本上指向了一个未来,即每个单独的链完成的任务更少,而不同的组件由不同的部分完成。
如果你看一下Layer1目前负责的任务,那么L1目前负责的是共享安全性。它是一个共享结算层。基本上,通过以太坊,它确保每个L2都能够以一种不依赖于任何中心化参与者,甚至任何有效数据集的方式读取任何其他L2。因为即使以太坊遭受了51%的攻击,所有的L2也会同时被还原,你仍然会保持一致性。
问题是,未来的理想方式是什么?在共享排序的问题上,我个人持中立态度。对于其他类型的功能,我认为我们绝对希望扩大L2或以太坊直接支持的数据量。在理想情况下,所有的东西都将是一个rollup,而以太坊将不会处理所有的数据可用性。但是我们知道在实践中,这可能还不够,即使是长期的16兆字节/槽的愿景也可能还不够。我想要看到的是,我希望非常高安全性的东西能够出现在链上的rollups中。
4. 在2月份的一条推文中,你讨论了AI在debug代码中的作用,这对以太坊至关重要。你能进一步思考AI如何在加密货币和以太坊中使用吗?
在过去的10年中,很多人都对人工智能和加密货币的交叉点感到非常好奇。但问题一直是,能否从这种主题性的融合中得到实际的应用示例,这些应用示例可以在生产上同时合理利用两者?在我大约两个月前发布的最新文章中,我试图分析这个问题,并试图确定一些具体的应用场景。
其中之一是AI参与以太坊上的预测市场或其他类型的市场,可以使市场更加微观化,然后让AI参与其中。另一个是AI作为钱包的一部分,帮助用户理解他们与之交互的在线和链上环境。第三个是使用密码学,尝试创建安全、强大和保护隐私的AI模型,以至于可以安全地将其用作链上应用程序的中心参与者,无论是DAO还是预言机等其他应用程序。
然后第四个是,如果成功了,那么它可以用于其他领域的AI。在这些应用中,我认为前两个是最明显、短期的,而后两个实际上更具有猜测性。因此,我绝对不想给人留下这样的印象,即AI加密应用将成为推动行业发展的下一个重大叙事或其他什么。但我绝对认为这些交叉点值得人们深入研究。
另一个是AI在代码debug中的作用。基本上,目前我们领域面临的最大挑战之一是我们代码中的错误。也许我们可以期待的一个很好的可能性之一是,AI将使我们能够更轻松地使用验证工具来证明更大范围的代码满足某些属性。如果我们这样做,那么我们有可能拥有像ZK EVM这样的确保无错的代码。减少我们能够减少的错误数量,空间变得更加安全。AI可能在这方面非常有价值。
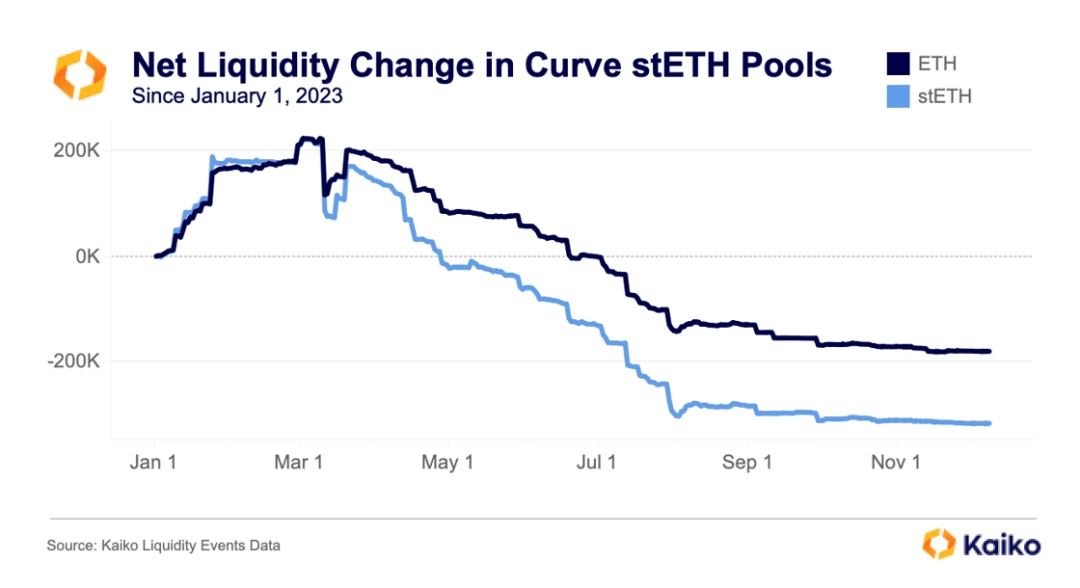
5. 你对以太坊的再质押热潮有什么看法?
我认为再质押是很有趣的,因为从一方面来说,它有潜力成为一种非常有价值的方式,可以解锁被用于质押的资金,并使其对其他应用程序可用。
就像这样的事情是其中之一,如果有需求,而我们又没有以某种方式满足这种需求,那么基本上就有可能让这种需求被中心化的行为所占据。因为任何人都可以接受他人的以太坊并代表他们进行质押,然后发行代币,然后让人们重新质押那些代币。但这并不是我们想看到的世界。但另一方面,再质押也确实存在风险,如果做得不好,比如各种系统性风险最终也会影响到以太坊的验证者。
因此,针对这个问题有一些不同的方法。我知道有一些不同的项目一直在研究。到目前为止,我只是在观望这个领域,期待看到会出现什么。
6. 你在Farcaster上的活跃程度比在Twitter上高吗?
社交领域有一个有趣的地方,就是它具有网络效应,但也有反网络效应。就像Twitter是所有人都在的地方,但也是所有真正让人讨厌的人都在的地方。
到目前为止,我发现Farcaster已经到了一个足够有趣的地步,那里有足够多的人,但与此同时,我在那里得到的互动质量实际上更高。
去中心化社交平台真正能够带来的另一个重要好处是,过去几年社交平台管理、转变以及围绕这一话题的所有讨论的一个主要问题就是,Twitter拥有并使用了一些功能,基本上是为了区分高质量内容和人,与低质量内容和人。而在加密货币领域,我认为许多这些非金融以太坊应用程序的根本目的,是以一种更加去中心化的方式解决这个问题,尝试解决信任问题。
我认为这些东西最终可能会与Farcaster相结合,以及Lens和其他一些协议。我们实际上可能会看到一个非常生动的示例,尝试着看看这些技术是否可行。Farcaster肯定已经开始出现实际的垃圾邮件问题。所以这是他们需要解决的问题。但我很高兴看到这一点。
7. 加密货币的发展和演变对你最令人惊讶的是什么?比如,你会告诉5年前的自己什么?
首先,在2020年,正如我可能在其他地方说过的那样,NFT确实让我感到惊讶。我认为,现在,热门的meme币再次出现确实令人惊讶。在积极的一面,我认为ZK技术的迅速进展确实让我感到惊讶。这是一个比我们预期的发生得更快的事情,这在软件领域是非常罕见的。
我认为第二部分是,一级协议更改的推出速度越来越快。就像我们进行了合并,然后进行了blob,这是合并后仅仅1.5年的时间,对吧?而且看起来我们在不久的将来将完成Verkle树。所以我对此也印象深刻。